v1.4.6
Forensics provides an intuitive user interface for appearance searching using accumulated video feeds and metadata from both VCAserver instances and IPAi cameras. The user interface provides a simple yet powerful search filter that users can use to search for cars, people and other objects based on colour characteristics.
This is the user guide for the Forensics and will describe the features and options within Forensics.
Forensics consists of two components
Note: Docker is required for the Forensics server to work. Please install Docker appropriate to your OS first before continuing.
For the purposes of this document, it is assumed that Forensics will be installed on a dedicated hardware platform.
The hardware specifications for a given system will depend on the intended number of video channels to be stored. Some initial guidelines are provided below:
For metadata storage requirements refer to storage estimations for guidance.
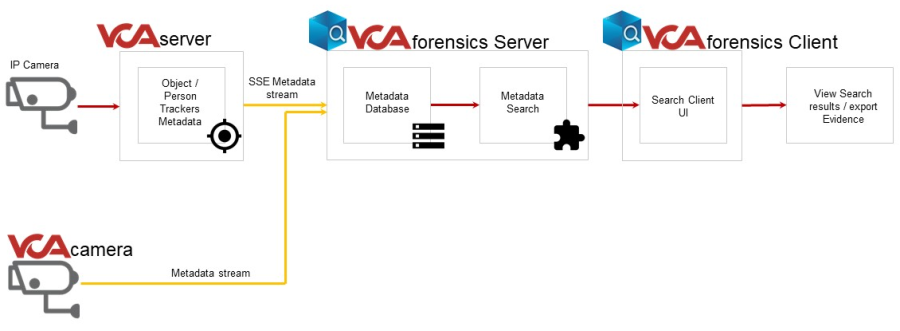
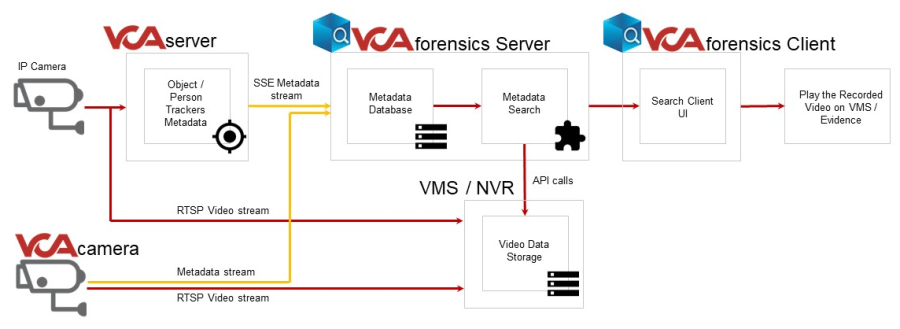
The forensics application sits as part of a wider system architecture, collecting data from VCA powered analytics devices and compatible VMS.
Note: It is important for the regional settings of the operating system to be defined correctly. Incorrect regional settings may prevent forensics from working correctly.
v2.2.0 and greaterv1.1.103 and greaterNx Witness 5.0.0Hikvision NVRCOLDSTOREDW SpectrumEMSTONEWisenet WAVEInstructions for downloading, installing, and uninstalling the Forensics application and its components.
The latest version of Forensics can be downloaded through the VCA Technology website or obtained from your local software distributor.
Version 139.0.3405.125)
Instructions for downloading, installing and uninstalling the Forensics Server and Client components on an Ubuntu 22.04 system.
The latest version of Forensics server can be downloaded through the VCA Technology website or obtained from your local software distributor.
The Forensics server component is installed using a command-line installer.
Change the file attributes of the installer wrapper to allow the script to run:
chmod +x ./forensics-server-installer-**VERSION_NUMBER**-linux-x86.run.Run the installer with the sudo command:
sudo ./forensics-server-installer-**VERSION_NUMBER**-linux-x86.run --install.Follow the on-screen instructions to complete the installation.
The command line options provide flexibility for administrators to customise the installation location and behaviour of the server component.
--help: Displays a list of all command-line options.
-i, --install: Installs the Forensics server package.
--app-location=[dir]: Specifies the directory to install the Forensics server. The default is /opt/forensics-server.
--data-location=[dir]: Specifies the directory to save metadata and snapshots. The default is /opt/forensics-server.
--skip-license: Accepts the license without prompting during installation.
-u, --uninstall: Uninstall [VCAforensics Server] package
The latest version of Forensics client can be downloaded through the VCA Technology website or obtained from your local software distributor.
The Forensics client is installed using a Debian package (.deb).
Run the following command to install the DEB file:
sudo apt install ./vcacforensics-client-installer-**VERSION_NUMBER**-linux-x86.debThe server component is uninstalled using the command-line installer with a specific option.
Run the following command:
sudo ./forensics-server-installer-**VERSION_NUMBER**-linux-x86.run --uninstallThe client component is uninstalled using the APT package manager.
Run the following command:
sudo apt remove vcacforensicsInstructions for installing and uninstalling the Forensics Server and Client components on a Windows 10 or 11 system.
The latest version of Forensics server can be downloaded through the VCA Technology website or obtained from your local software distributor.
The Forensics server is downloaded as a exe file.
.exe file and follow the on-screen instructions.The latest version of Forensics client can be downloaded through the VCA Technology website or obtained from your local software distributor.
The Forensics client is installed via an executable .exe file.
Run the installer (.exe) file.
The installation process will begin, and the client application will launch automatically upon completion.
The server component is uninstalled through the standard Windows Apps & Features control panel.
Open Apps & Features in Windows Settings.
Select Forensics Server from the list.
Click Uninstall.
The client component is uninstalled through the standard Windows Apps & Features control panel.
Open Apps & Features in Windows Settings.
Select Forensics client from the list.
Click Uninstall.
Instructions for installing the Forensics client on a MACOS 10.15 system.
The latest version of Forensics client can be downloaded through the VCA Technology website or obtained from your local software distributor.
Double-click the DMG file to mount it.
Drag the application icon to the Applications folder to install.
Note: To install the application on MACOS, the option to Open a Mac app from an unidentified developer may need to be enabled in your system settings.
After successfully installing the application, follow these steps:
Connect the client to a server.
Configure your System Settings Time zone, Users, and License server.
Configure VMS connections (if applicable).
Allocate the required number of licenses.
Add VCA sources and link to VMS channels (if available).
Start a search to begin forensic analysis.
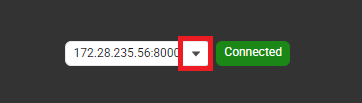
The Login screen is displayed when the Forensics client is not connected to a server. The Client can be connected and disconnected to a server without effecting server functions.
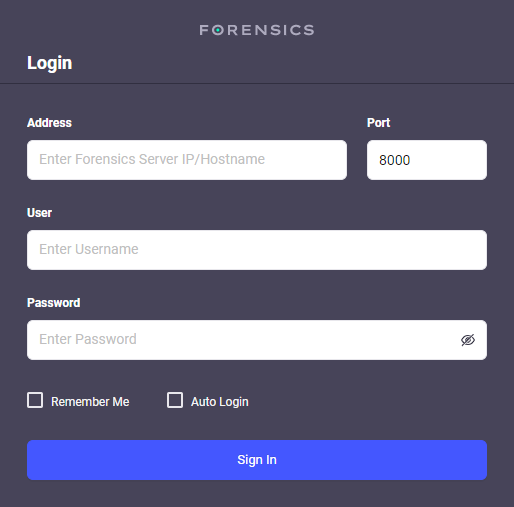
Address: Defines the Forensics server IP address or hostname.
Port: Defines the port to connect to the server, the default port is 8000.
User: Enter the username to access the server, the default username is admin.
Password: Enter the password to access the server, the default password is admin.
Remember Me: Check to allow the client to remember your details.
Auto Login: Check to allow the client to automatically log you in.
Sign In: Click to start the log in process.
The Forensics Server Management serves as the central hub for configuring and monitoring key server components. It includes settings related to system information, disk usage, time format configuration, and language preferences.

The System tab displays the server’s current status, including uptime, software version, search engine, and data collector service status. It also provides options to restart the server service, reset configurations and user settings, delete all data, and export logs.
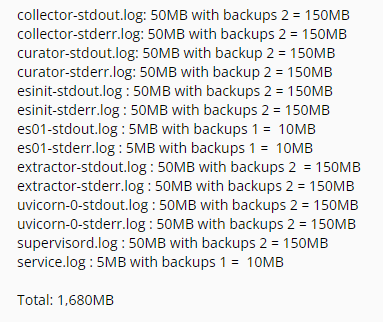
Note: Forensics logs are encrypted.
The Forensics log file provides detailed information and insight into the performance and compliance of the Forensics application. The Forensics server logs contains various storage models for managing the logs and can expand to a maximum size of 1.6 GB.
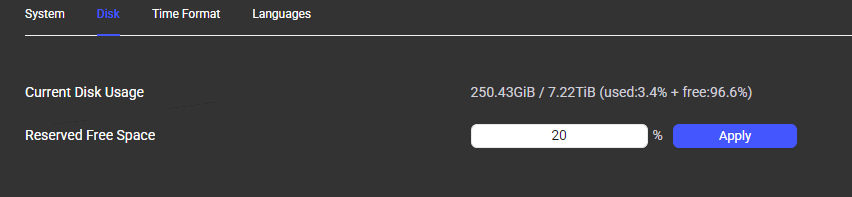
The Disk tab allows you to monitor and manage the storage space used by the Forensics system. It displays the current used and free space, the reserved free space, and an option to apply changes made to the reserved free space setting.
The Time Format tab enables you to customise how time is presented throughout the Forensics platform. Adjusting this setting helps ensure that all time-related data, such as logs, events, and video timestamps are displayed in a format that aligns with your regional or organisational preferences.

Note: The correct setting on the time zone is required to ensure queries return accurate results.
The Languages tab allows you to change the language used for the Forensics system’s user interface.

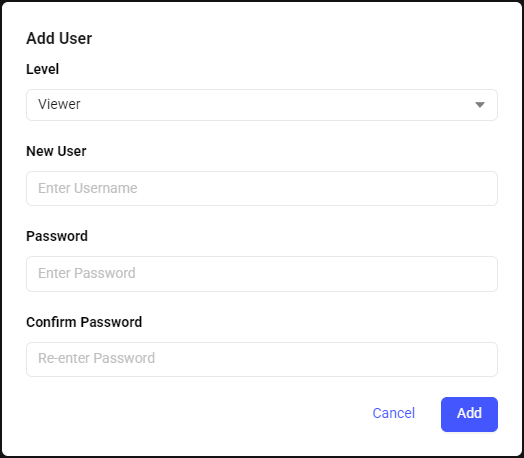
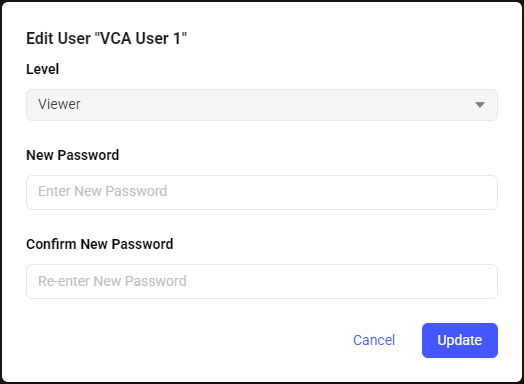
In the Users menu, administrators can manage users by adding or deleting accounts, changing passwords, and setting access levels.
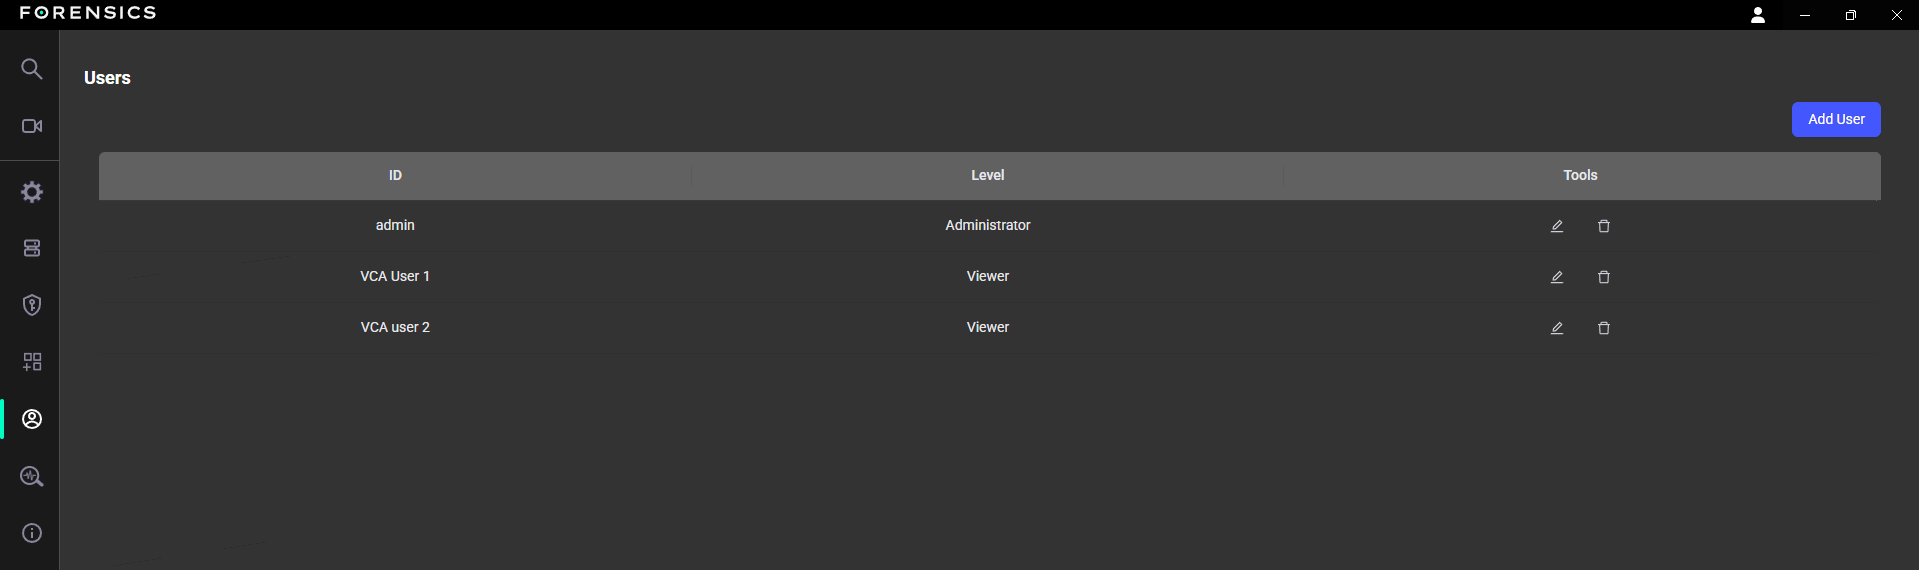
Note: When editing an existing user, administrators can update the access level and password. However, the username cannot be changed.


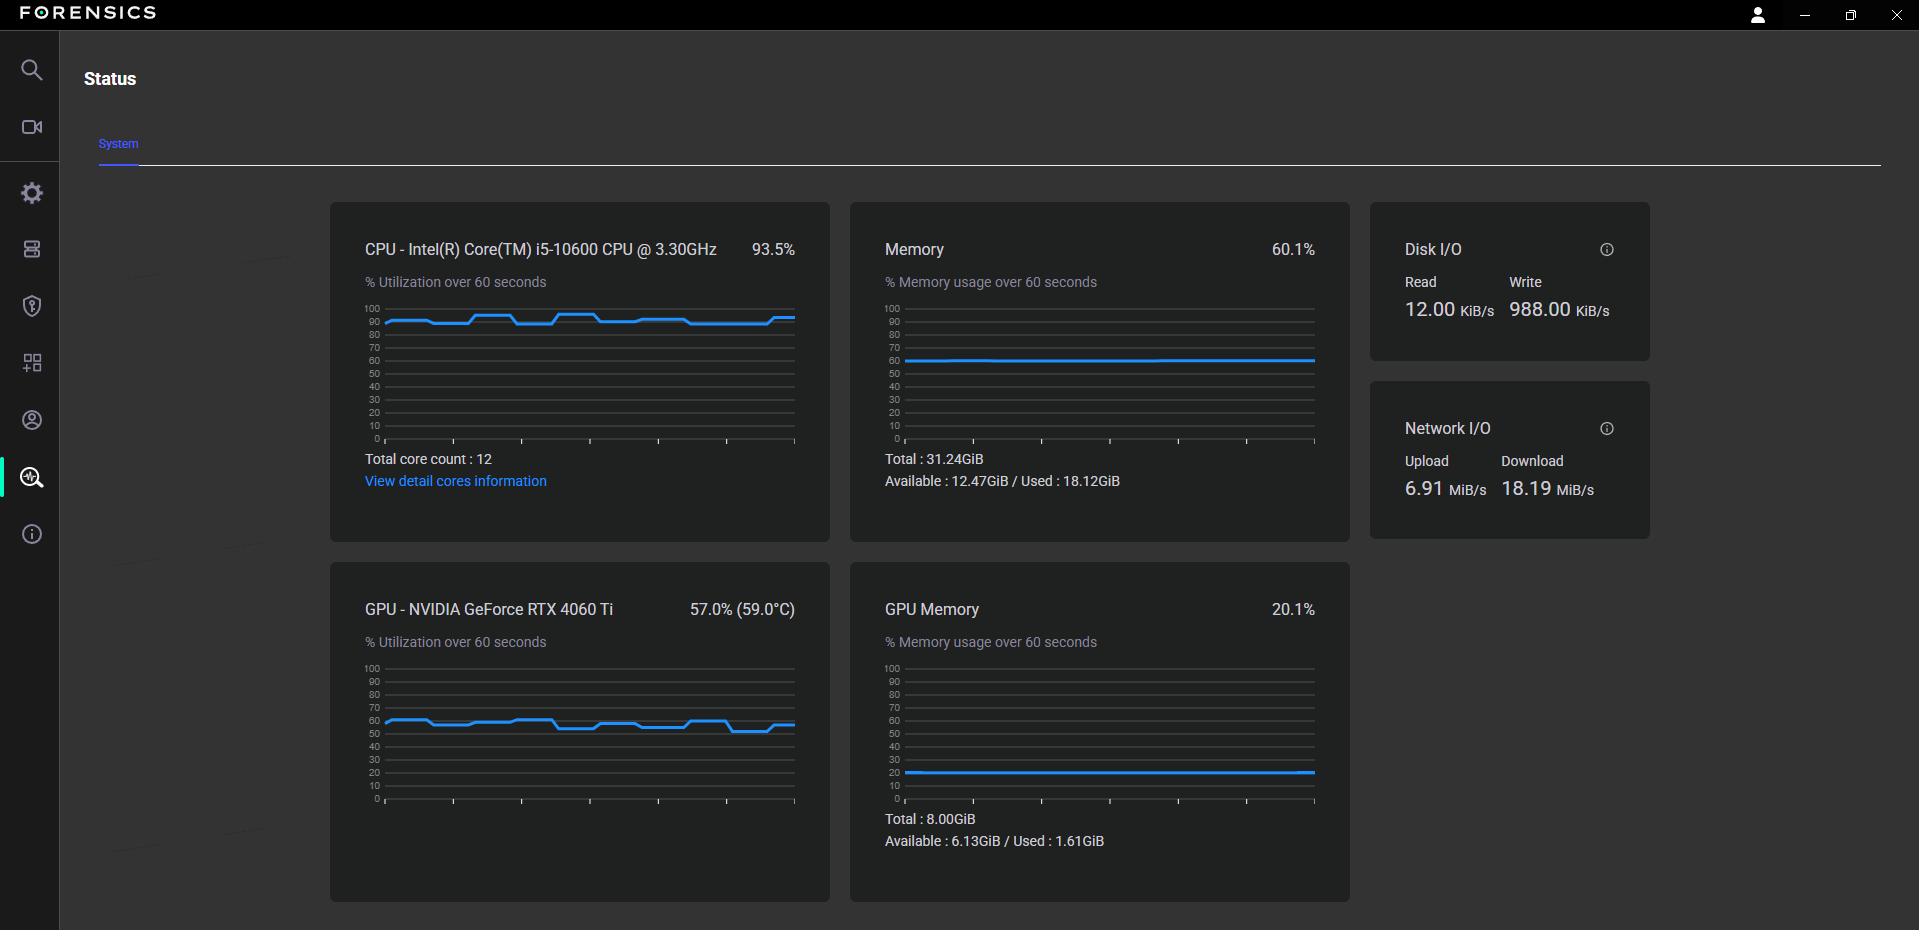
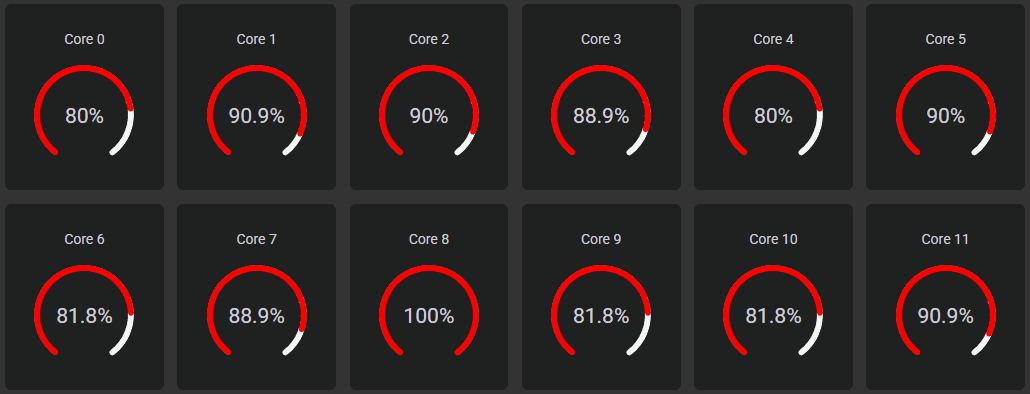
The Status menu serves a overview of all the hardware components within your computer system, providing real-time insights into the performance and health of essential hardware elements for forensics.
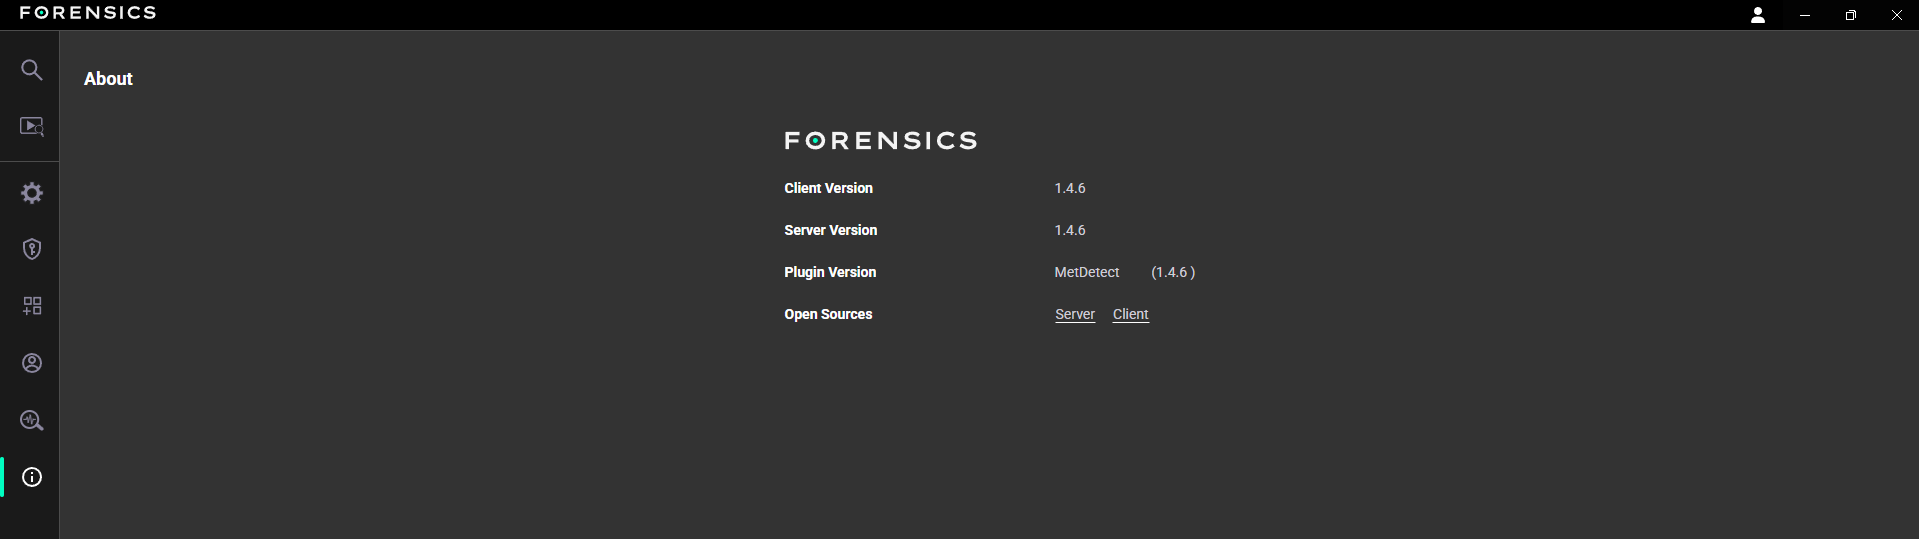
Detailed information on the Client and Server versions, plug-in versions, as well as the open-source software versions utilised by the application.
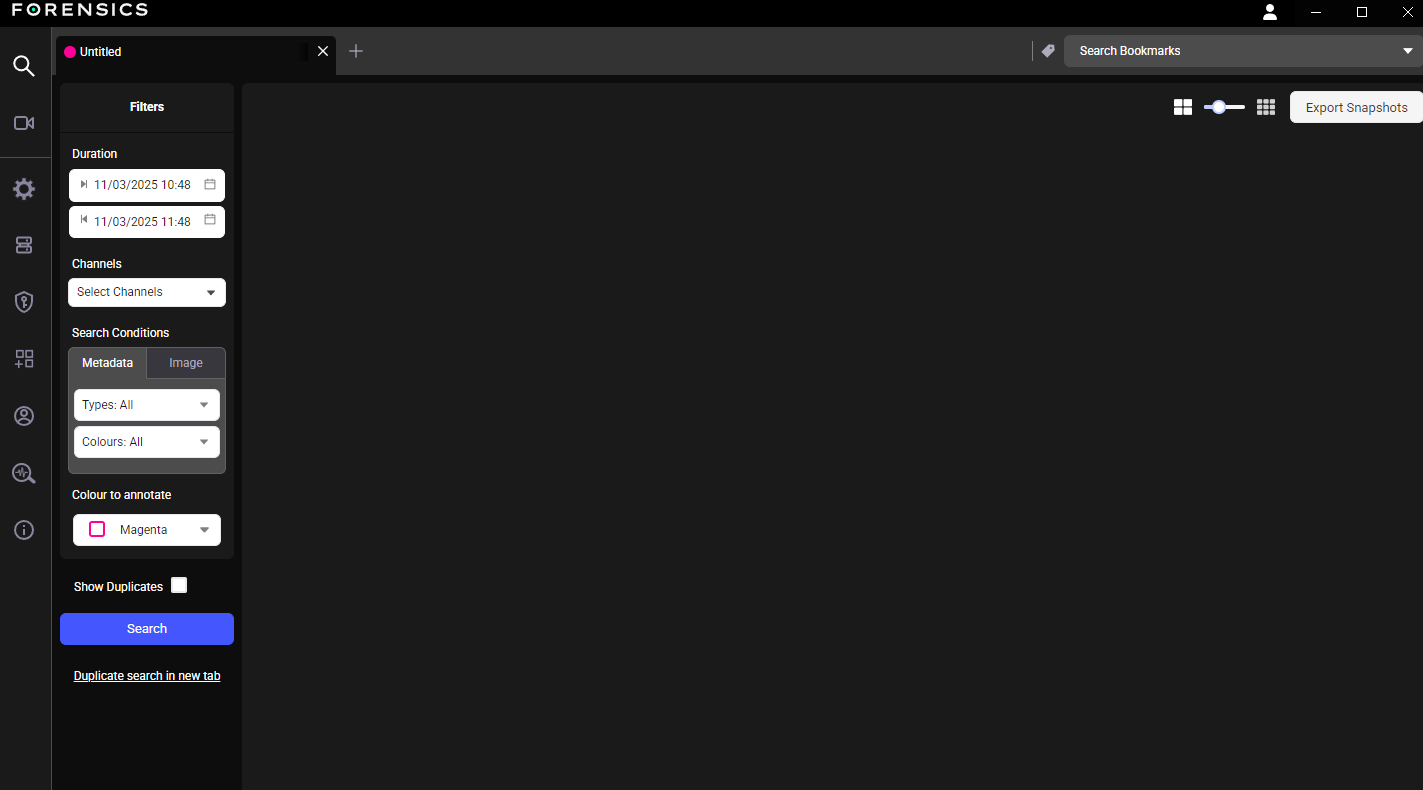
The Search feature is a powerful tool for sifting through recorded metadata to find specific events. It allows for the creation of custom queries to display images that match the defined criteria. Up to 12 simultaneous searches can be run in separate tabs, and the results can be bookmarked, with the option to export both images and data for further analysis. The main window is divided into several panels, each dedicated to defining a different part of the search query.
Tabs are created for each search, with a maximum of 12 tabs displayed at any one time. Tabs can be selected by clicking on the required tab, new tabs can be opened by click the + and they can be closed by clicking the x in the tab header.
Allows for the saving of search conditions and tabs for future use. This is a convenient way to save complex or frequently used queries without having to set them up again.
Saves a specific search query with all conditions and parameters for future use.
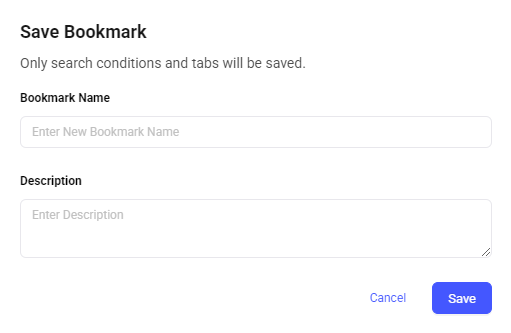
Click the bookmark’s pencil icon to open a prompt to enter a name and description for the saved search.
Bookmark Name: Allows the definition of a unique name for the bookmark. The name should be descriptive to make it easy to find later.
Description: Define additional details about the bookmark. This can be used to describe the purpose of the search or specific details about the conditions.
Cancel: Close the bookmark windows without saving.
Save: Save the bookmark with the specified name and description. Only the search conditions and tabs will be saved, the specific results of the query will not be saved.
Configure desired search parameters (Target, Time Range, Channel).
Click the bookmark icon (the pencil icon) to open the “Save Bookmark” window.
In the Bookmark Name field, enter a clear, descriptive name for searching.
(Optional) Add a Description note to provide more details about the bookmark.
Click the Save button.
Find and load a previously saved search bookmark. This option allows quick filtering through saved bookmarks and selection of the one to be loaded. The search bar assists in locating the desired bookmark.
Permanently remove a saved search bookmark. Use to delete outdated or unnecessary searches, ensuring the bookmark list remains organized. Each saved bookmark in the list includes a bin icon for removal.
Click the bin icon to delete the bookmark.
The Search panel allows users to conduct searches for specific objects and events based on a variety of criteria.
Allows the specification of the object type to be searched. It offers a variety of object types, such as Bag, Bicycle, Person, and Truck.
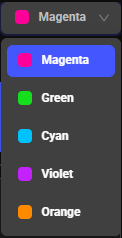
Filter the results based on the object’s colour to refine searches. Users can select multiple targets and colours simultaneously to broaden search queries. Only colours within the database are available.
Allow users to set a precise date and time range. Users can use the calendar drop-down to select a specific date, and the time picker to set the exact hour and minute.
Displays a list of all available channels. One or more channels can be selected for searching. Filtering options within this panel allow narrowing the list by Forensics Server, Device Type, or Channel Name.
Select a specific colour for highlighting search results in the timeline view. Choose a colour from a drop-down menu. This colour will then be used to mark events on the timeline, making them easier to identify visually.
Determines whether duplicate search results are displayed

When checked: Show results where the same object (object ID) was tracked in different frames.
When unchecked: Only one instance of each unique detection is shown to reduce clutter.
Initiates the search based on the defined parameters.
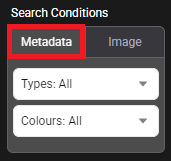
Choose the method for conducting a search: either by using predefined metadata categories or by uploading a specific image to find similar objects.
Allows users to define objects based on predefined categories and attributes, such as object type and colour.
Displays the available objects that can be selected for searches, any combination can be defined.
Note: Exclusively selecting “Person” provides access to defining Torso and Leg colours
Filter search results based on the colour of objects. The colour section presents a palette of different colours. One or more colours can be selected to narrow the search to objects tagged with those colours.
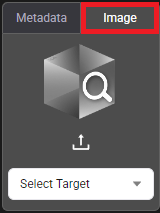
This feature is for users to upload or use registered objects for the search. It performs a reverse image search against the video database. Instead of using descriptive tags, a user provides an image to find similar objects within the recorded data. This image can be newly uploaded or one that was previously registered (saved) from a past search. This is particularly useful for:
Finding a specific person or object: A user can upload an image of an object, providing a clear profile of the top and bottom of a person or object.
Using a previously saved image: A user can use images that have been previously imported or registered to run a new search.
The Image Search function allows for more visual and targeted queries when a user has a specific visual reference to work with.
Note: To use the image feature, the channels image search must be enabled. in the video source menu. This will turn on additional deep learning features on the channel within the analytic server. The image search feature is only available on VCAserver and VCAnx analytic sources.
Create New Target: Defines a new target by specifying a name and uploading between one and five cropped images taken from different angles.
Upload Or Drag Images: Click the plus (+) sign to select images from the local computer. Images can also be dragged and dropped into the UI.
Target Name: Enter a reference name to identify the target, this can be anything.
Register Target: Register and save the images to be used for future image searches or bookmarks.
Note: When a registered target is selected, the Update Target and Delete Target options become available.
Note: Temporary targets can be used for image search without having to register them.
Registered Targets: View and manage all previously created image search targets. The list displays the name of each registered target along with the number of images associated with it. A target can be selected from this list to load its images for a search.
To define the specific time range for a search, a date and time can be entered manually or a predefined duration (Last 1 hour, Yesterday) can be selected. The application only searches for data that falls within the specified start and end timestamps, significantly reducing the search time and scope.
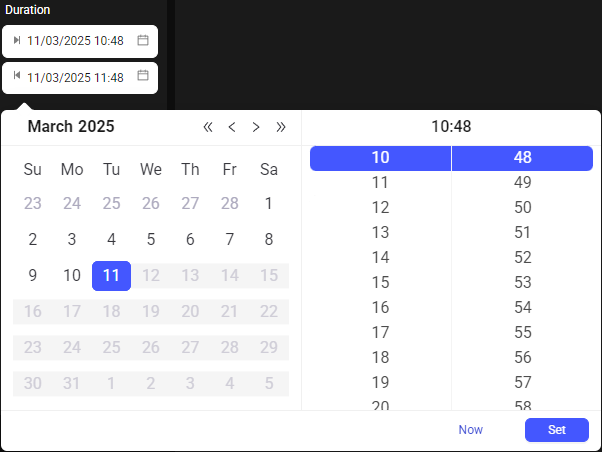
Note: Selecting Now will automatically set the time range to the past hour.
Provides a list of all available VCA sources. Individual channels or multiple channels can be selected for inclusion in the search.
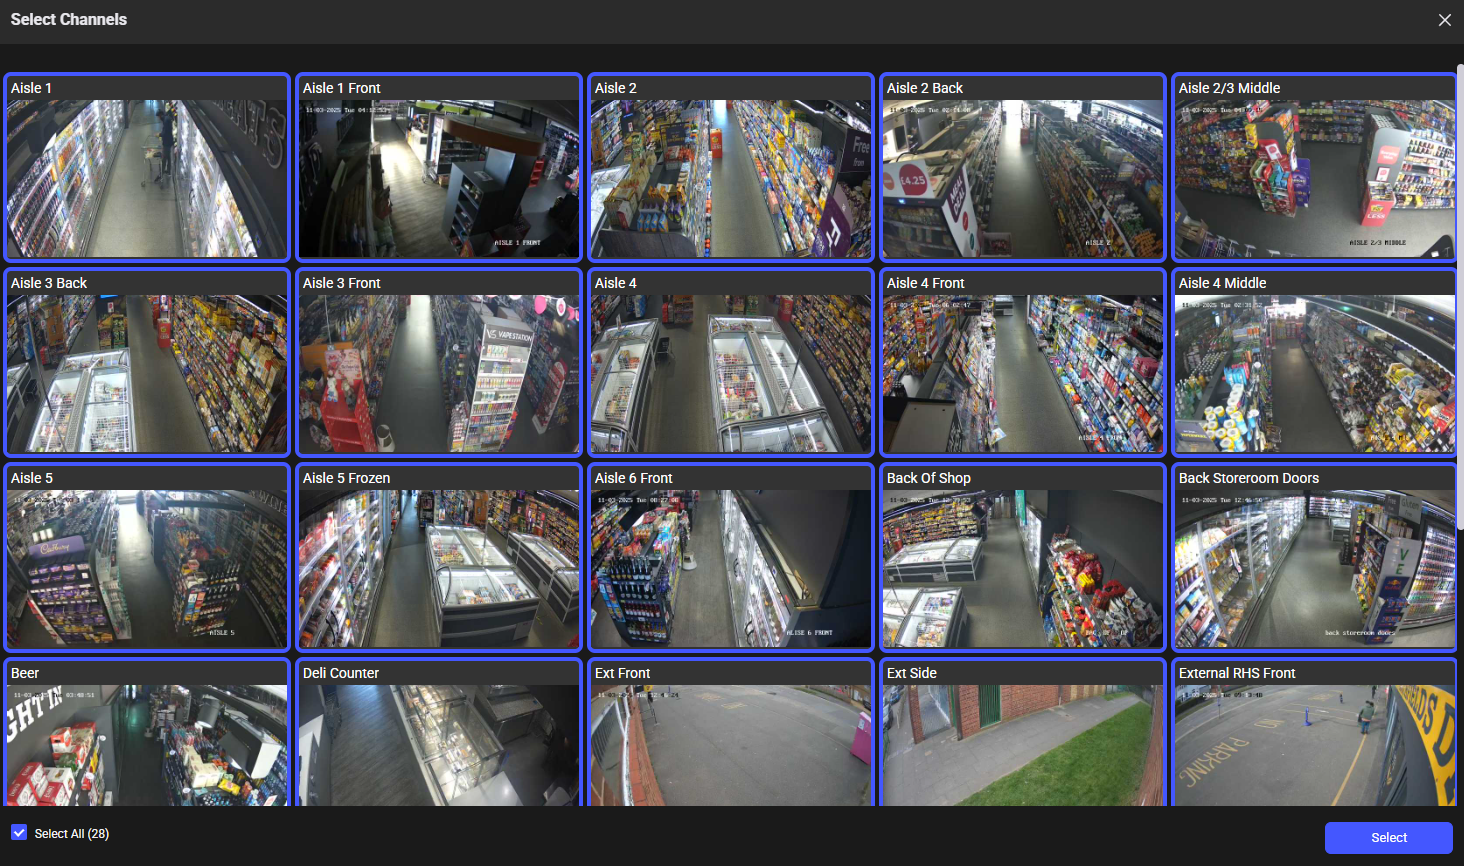
Select the channels that will be used during the search.
Forensics Server: Filter the list of available channels by the Forensics server they belong to. Use this when it is necessary to perform a search on a specific server within a clustered environment to narrow down the results.

- **Reset:** Click the Reset button to revert the channel list to its default state, showing all available channelswithout any filters applied.
Device Type: Filter the available device type they are associated with.
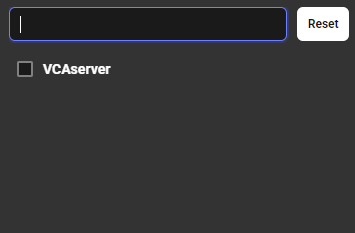
Select the drop-down menu that lists various device types (VCAserver, Camera, VCAnx). Selecting a device type will refine the channel list to show only channels from that type of device.
Channel Name: Enter a channel name to search for a specific channel.
MetDetect: Channel list to show only channels that have the MetDetect plug-in active.
VCAforensics: Display and select channels that are actively connected to the Forensics server.
To perform a search, follow the steps below:
Navigate to the Search section.
Under Search Type, select either Metadata or Image.
Fill out the relevant search parameters, such as Target, Colours, and the Start Time and End Time.
Select the Channel(s) to search.
Click the Search button.
After performing a search, the results are displayed in a structured layout, providing various tools to review and analyse the data.
Provides a summary of the search results and displays the total number of results found. Each thumbnail represents a single detected event.
Columns: Use the scroll bar to define the number of columns to display in the results grid. The default column number is set to 10
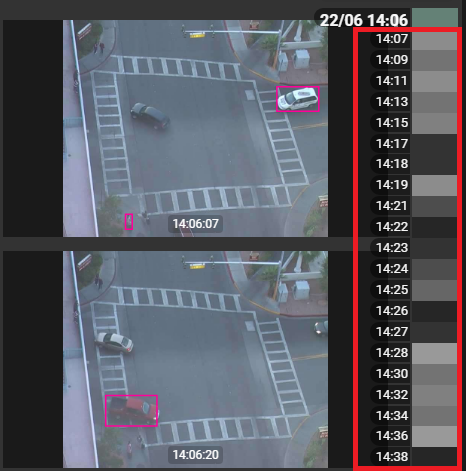
Timeline: Displays a visual representation of the results and events over time. Users can quickly navigate to specific points where events occurred.
When an image is selected from the search results, users can view more details about the objects identified in the image. Enabling a magnifying option, select other objects in the image and define new search criteria and start another search.
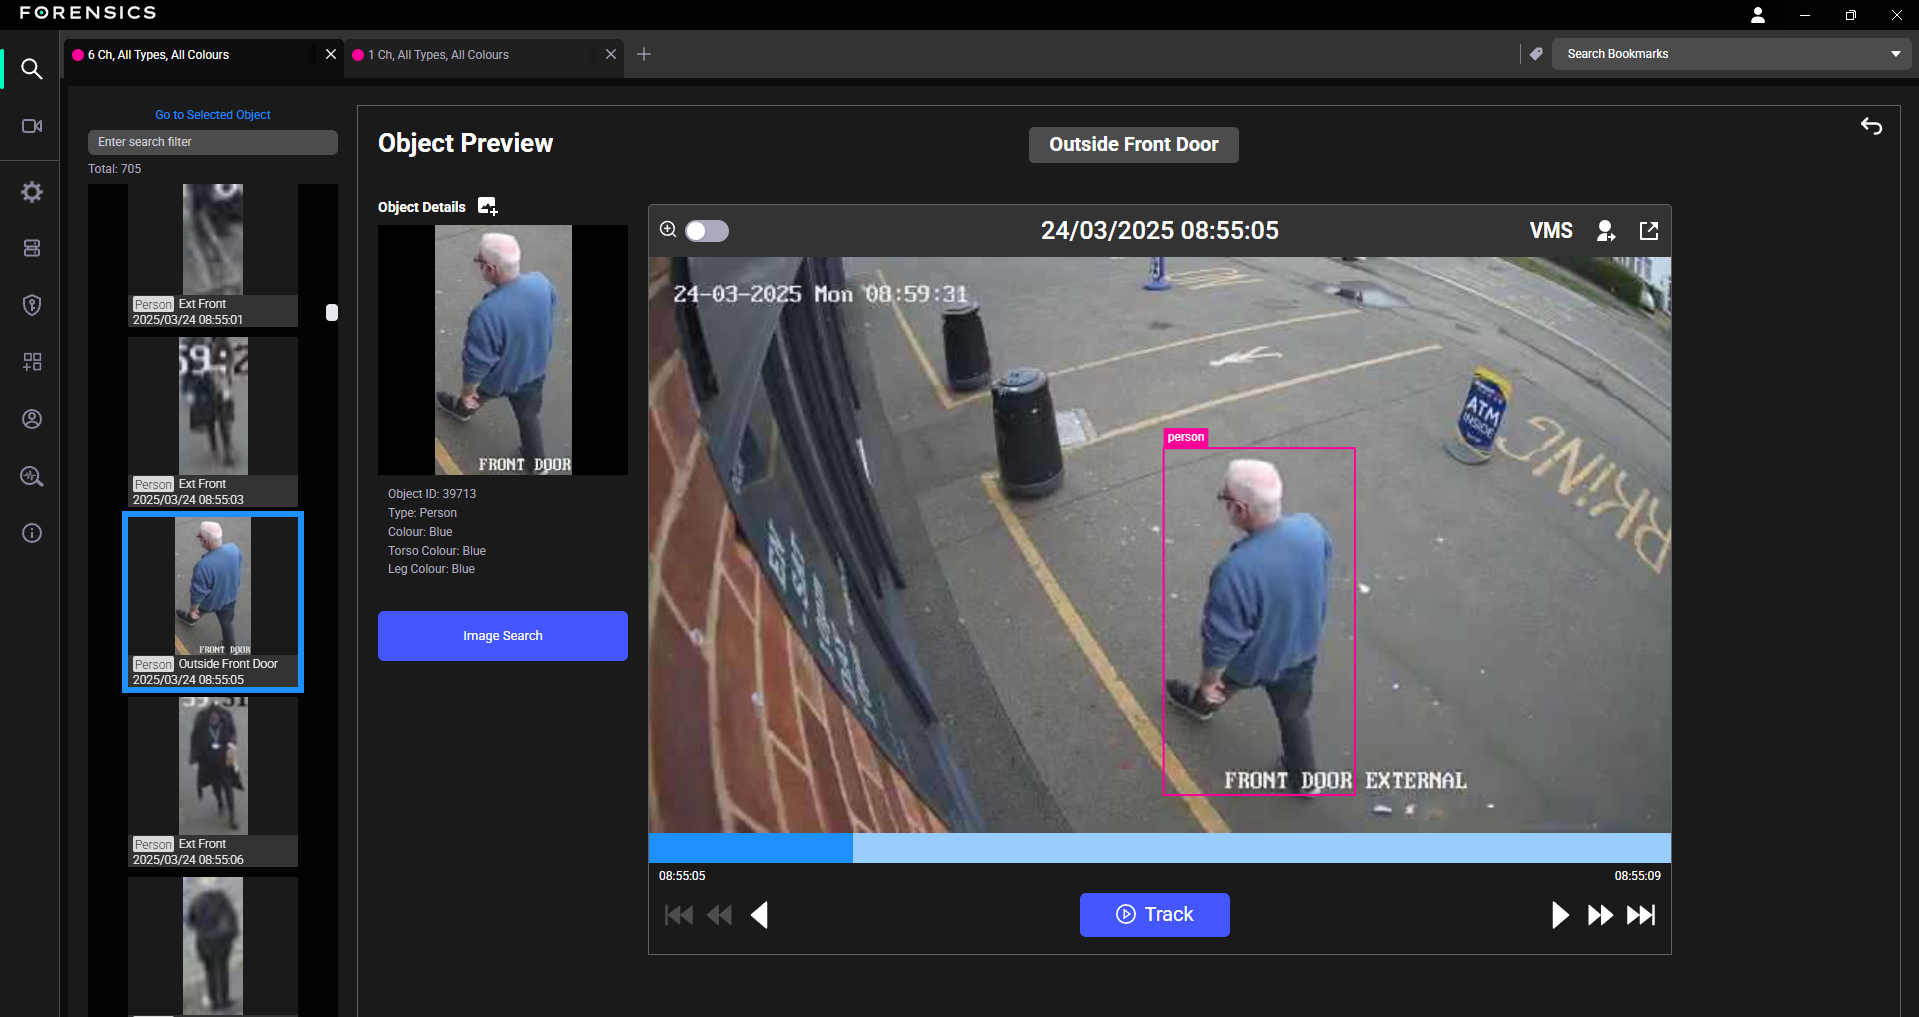
Provides metadata and information about a selected object from the search results. It displays the date, time, and attributes such as Object ID, Type, Colour, Torso Colour, and Leg Colour for the selected object.
Object ID: Displays the object ID for the selected object.
Type: Displays the type of object identified by the search engine, such as Person, Car, or Bag.
Colour: Displays the dominant colour of the object.
Torso Colour: Displays the torso colour for the selected object.
Leg Colour: Displays the leg colour for the selected object.
Note: Exclusively selecting “Person” provides access to defining Torso and Leg colours
Zoom In Magnify: Enable to allow the user to hover over the thumbnail image and zoom in on a particular area, providing a magnified view.
Add To Image Folder: Provides a temporary storage space for images selected from search results, allowing multiple images to be collected for later export, with the folder icon displaying a badge indicating the current number of stored images.
Export: Download all the collected images currently in the image folder.
Clear: Remove all images from the image folder.
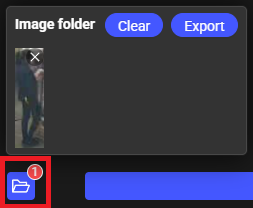
Image Search: Click to open a new tab to displays the criteria for further image search conditions.
Play Object Motion: Click to play the video segment that contains the selected object’s motion.
Note: The playback speed is set to 1 frame per second.
Move to the start: Go to the start of the video.
Go back 5 frames: Go back 5 frames.
Previous Frame: Go back to the previous frame.
Play and Pause: Play/Pause video.
Move to the end: Go to the end of the video.
Go forward 5 frames: Go forward 5 frames.
Next frame: Go forward to the next frame.
Note: User can drag the slider along the timeline to manually move through the video segment.
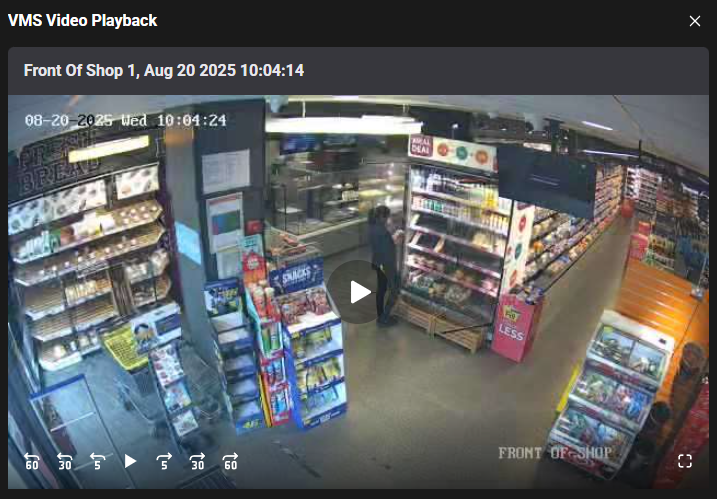
User can view the complete context of the event, including what happened before and after the object was detected.
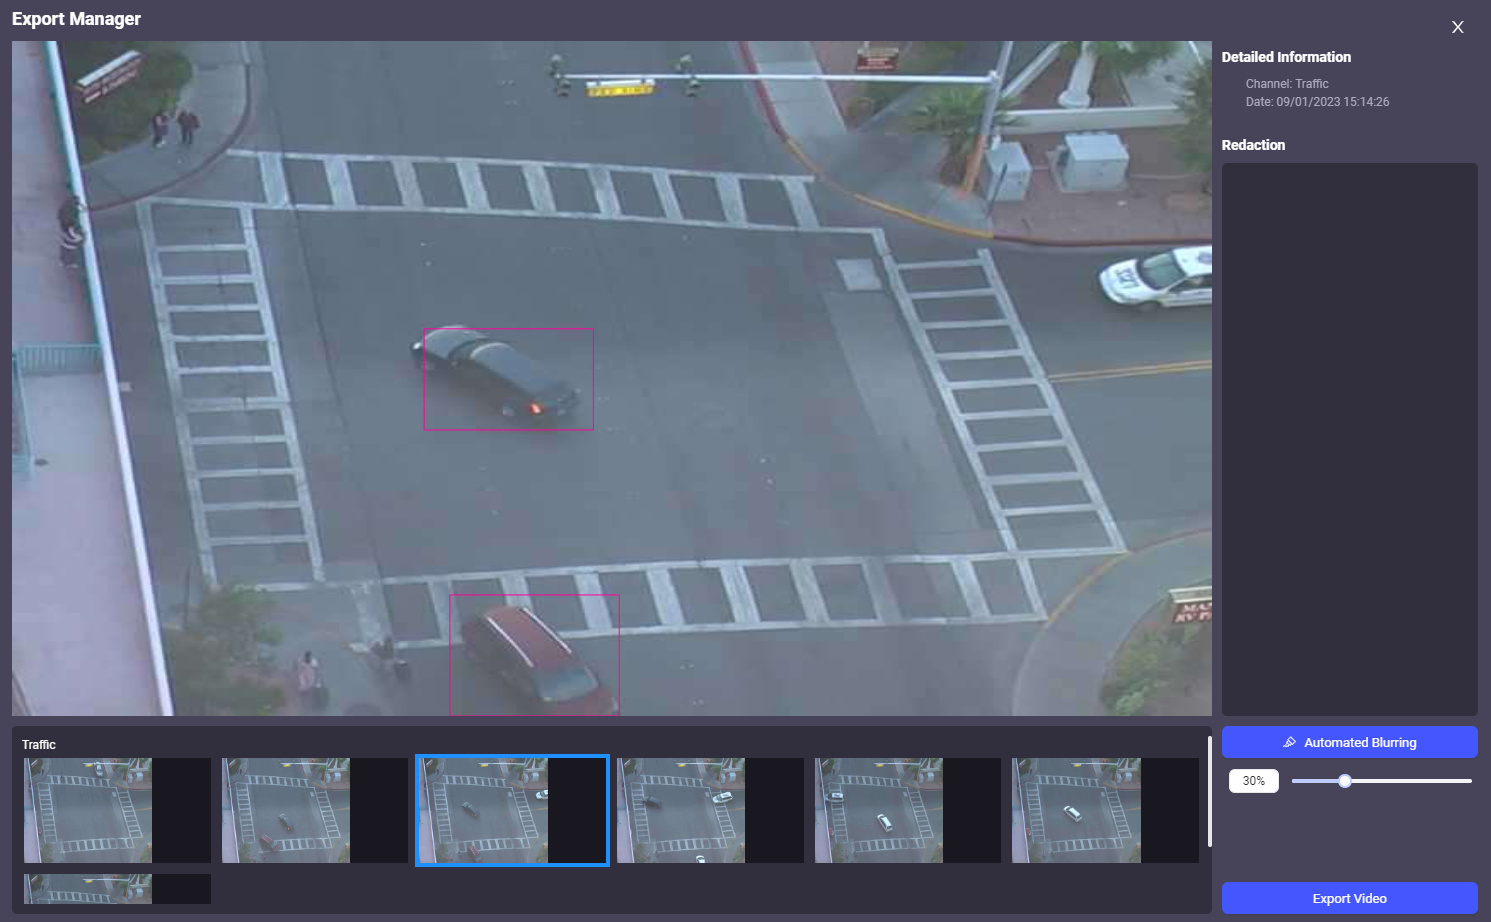
Create Report for Object allows users to generate a detailed report, including exporting snapshots and a video clip of the selected object, with the option for redaction.
The redaction options are part of the export management process and are displayed after selecting the Export Timeline as Video or Export Snapshot.
User can create a manageable clip of the event for evidence or to present to others.
Detailed Information: Provide a summary of the selected object’s details and displays the Channel from which the object was captured and the Date and Time of the event.
Automated Blurring: Add automated blur to the detected object for privacy and data protection ensuring that its identity is obscured.
Export as Video: Generates and exports a video file of the object’s movement, including any applied redactions. This option can be used to create a video clip of the event for evidence or to share a redacted version of the footage for external analysis.
Export Snapshots: Generates and exports either a series of still images or a single image of the object at key moments. This option can be used to create images for reports, presentations, or further analysis, with the ability to share redacted versions where required.
Note: When exporting videos or snapshots, two versions are generated, the original and a redacted version.